
Seeds, miraculous seed! Ever wonder how a plant grows from such a tiny seed? Here’s an activity to explore just how miraculous seeds are.
Seed Dissection Experiment
AUDIENCE:
This experiment is written for scientists in grades 3-5. It can be scaled down to use as an activity with younger scientists. Adding the “Seed Hiker” skit will help provide a visual for scientists. See Resource Corner for additional ways to adapt this experiment for different grades.
STANDARDS CONNECTION:
From Molecules to Organisms: Structures and Processes
3-LS1-1: Develop models to describe that organisms have unique and diverse life cycles but all have in common birth, growth, reproduction, and death.
4-LS1-1: Construct an argument that plants and animals have internal and external structures that function to support survival, growth, behavior, and reproduction.
5-LS1-1: Support an argument that plants get the materials they need for growth chiefly from air and water.
LEARNING OBJECTIVES:
- Scientists will understand how to identify the parts of the seed
- Scientists will understand what a seed needs to grow
VOCABULARY:
Seed Coat: the outer layer of the seed that protects the seed until it is ready to grow
Cotyledon: contains the food for the seed and give the embryo energy to grow(carbohydrates and protein)
Embryo: the baby plant that includes the roots and first leaves will grow into the plant
First Leaves: the first leaves to emerge through the soil
Dicot: a seed that has two cotyledons
SEED ANATOMY SKIT:
- Backpack
- Poncho/raincoat
- Water bottle
- Snack bag
- Hat
SEED DISSECTION:
- Pre-soaked bean (12-24 hrs)
- Bean Diagram
SEED EXPERIMENT MATERIALS (per scientist):
- 4 Pre-soaked beans (larger varieties are better, pre-soak 12-24 hrs)
- Bean Diagram
- Sandwich bag
- Paper towel
- Water (Tablespoon)
- Stapler & Staples (or paperclips)
RECIPE: Lemon Herb Hummus
ACTIVITY SOURCES:
Set-up
Pre-soak bean seeds.
Steps to set up Ziploc Bag:
- Fold paper towel to fit inside ziploc bag
- Staple across the bag 2 inches up from the bottom
I: Introduction (5 minutes)
Time to ask questions! Introduce your chefs to the activity by asking them open-ended questions such as:
- What do seeds need to grow?
- What do you think this seed looks like on the inside?
- How do you think a plant grows from a seed?
II: Seed Anatomy Skit (15 minutes)
Ask your scientists if they are going on a hike or a long walk outside what are some of the items they should bring with them. Items listed should include food, water bottle, raincoat, backpack, hat (prompt when necessary: i.e. “what would you need if it rains?”).
Explain that a seed is very similar to a hiker because it has almost everything it needs to survive in this tiny little seed. Using items you would use to go hiking act out a sprouting seed. Start with your food, water bottle, and hat inside your backpack. Wear your backpack under your raincoat/poncho. (You can either be the seed or you can dress your scientist up as the seed). You can also create labels for each part (see picture below).
- “Right now you are a seed waiting for the perfect growing conditions. You need water to start your growth.” Run around the scientist sprinkling pretend water over them. Have them take off their raincoat/poncho.
- Explain that the seed gets rid of its seed coat when the seed is ready to start growing. Inside the seed is a baby plant that has a tiny root to drink up the water.
- “Reach into the backpack for the water bottle to take a drink.”
- Explain that inside the seed is a baby plant, or an embryo, that has a tiny root to drink up the water.
- “Now reach into your backpack and grab your hat, these are the first leaves to sprout out of the ground.”
- Explain that in every seed there is a first leaf ready to pop out of the ground
- “You’ve been growing for a while, you’ll need some food to give you energy. Reach into your bag to get some food”
- Explain that just like humans, plants need food to have energy to grow. A seed has the initial food for the seed to start growing, this is called the cotyledon. Once it starts to grow the plant gets its food from the soil and from the sun.
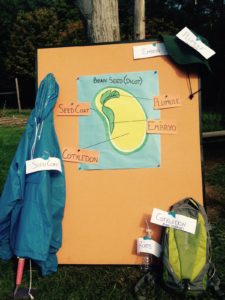
Note in this photo the word Plume instead of first leaf.
III: Bean Dissection (10 minutes)
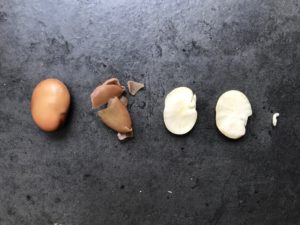
- Using one of the pre-soaked beans gently pull away the outer layer. This is called the seed coat. Ask your scientist what they think this part of the seed is used for. Explain that the seed coat protects the seed until it is ready to grow.
- Gently split the bean in half and explore. Ask your scientist what they think is inside the seed after opening it.
- Help your scientist identify the embryo, first leaf, and cotyledon. Explain the definition for each part of the seed.
- Cotyledon: contains the food for the seed and gives the embryo energy to grow(carbohydrates and protein). Note that this seed has two halves or two cotyledons. This type of seed is called a dicot.
- Embryo: the baby plant that includes the roots and first leaves will grow into the plant
- First Leaves: are the first leaves to emerge through the soil
- Using the Seed Diagram (at the end of this activity), have your scientist label the appropriate parts of the seed.
IV: Seed Dissection Experiment (15 mins-several days)
This experiment will help your scientist identify the importance of all the parts of the seed. See Resource Corner for how to scale up this experiment for the age of your scientist.
- Fold paper towel to fit inside ziploc bag
- Staple across the bag 2 inches up from the bottom
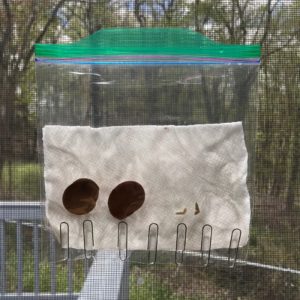
- Take 2 of the pre-soaked beans and place in the ziploc bag
- With the other to seeds gently remove the seed coat and gently split in half
- Gently remove the embryos (root & first leaf) the 2 beans
- Place the two seed embryos into the ziploc bag
- Moisten paper towel with 1 Tablespoon of water (too much can rot the seed)
- Tape to a window that gets moderate to full sun leaving top of bag open
- Observe for one week, add one Tablespoon of water when the paper towel dries
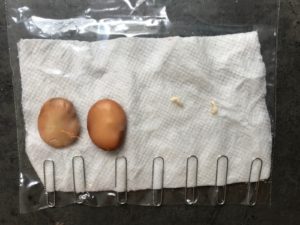
Note: we didn’t have a stapler so we improvised with paperclips.
III: Evaluate (5 minutes)
After putting together the experiment, ask your scientist what they think will happen. Observe for one week. Ask your scientist about what they observe. Why do they think ______ is happening? What happens when we don’t have enough food? Do we have less energy? What about animals?
IV: Recipe – Lemon Herb Hummus (10-20 minutes)
Resource Corner
Relevant Background Information and Activity Alternatives
- Older Scientists – have your older scientists create a hypothesis for how they think the whole seed and embryo will grow.
- Hypothesis – a guess based on what you already know about what will happen
- Create a hypothesis with your scientist using an “If… then…” statement. (i.e. “IF I remove the embryo from the seed, THEN __________.”)
- Older Scientists – have older scientists draw their own diagram and label it
- Younger Scientists
- Pair down this experiment by just completing it as a seed dissection activity, you can work through the diagram together, scribing for scientists that need assistance. You could have your young scientists color in the part of the seed as you discuss it.
- A seed with only one cotyledon is called a monocot. An example of a monocot would be corn.
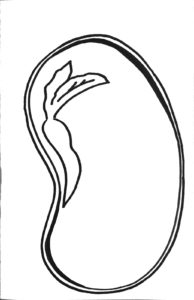
Bean Diagram
Draw a line to each part of the seed and label it with the appropriate name. Parts of the seed are Seed Coat, Cotyledon, Embryo, and First Leaves.